How To Apply Makeup for Beginners
If you’re new to makeup application, the process of putting it on can be daunting. However, there are some easy tips and tricks that all beginners should know. Here’s a quick and easy guide to getting started with your makeup journey.
1. Start with a clean face
The first step to any good makeup routine is starting with a clean slate. Be sure to wash your face with a gentle cleanser and remove any unwanted facial hair. This will help your makeup go on smoothly and last longer throughout the day.
2. Prime your face
After you’ve cleansed your face, it’s time to prime it. This step is important because it helps create an even canvas for your makeup. Simply apply a primer with a makeup sponge all over your face and wait a few minutes for it to set before moving on to the next step.
3. Choose the right foundation
Not all foundations are created equal. It’s important to choose a foundation that matches your skin tone and provides the coverage you’re looking for. If you’re not sure which one to choose, ask a salesperson at your local beauty store for help.
 4. Conceal problem areas
Once you’ve applied your foundation, it’s time to conceal any problem areas. Use a concealer that matches your skin tone and apply it to any blemishes, dark circles, or other imperfections. Be sure to blend the concealer well so that it looks natural.
5. Apply makeup to your eyes
The next step is to apply makeup to your eyes. Start by applying a base color all over your lid. Then, use a darker shade in the crease of your eye and a lighter eyeshadow shade along your brow bone. Finish things off by applying mascara to your lashes and eyeliner to your lash line. [Here’s how to fix eye bags]
6. Fill in your eyebrows
Filling in your eyebrows is a great way to frame your face and make your eyes pop. Use an eyebrow pencil or powder to fill in any sparse areas, following the shape of your brow.
7. Contour your face
Contouring is a great way to add definition. Use a dark powder or cream to contour along your hairline, jawline, and cheekbones. Be sure to blend well so that the lines are not too harsh.
8. Add some color to your cheeks
Adding a touch of color to your cheeks is a great way to brighten up your face. Use a powder or cream blush and apply it to the apples of your cheeks. Blend well for a natural look.
9. Highlight your features
Highlighting is the process of adding a lighter shade of makeup to certain areas of your face. This helps create the illusion of more defined features. Use a highlighter to your forehead, cheekbones, and cupid’s bow.
10. Set your makeup
The final step is to set your makeup so that it lasts all day long. Use a setting powder or spray to help keep your makeup in place. Apply it all over or just to the areas that tend to get oily throughout the day.
How Makeup Artists Prep the Skin
One of the most important steps in any makeup routine is prepping the skin. This helps to ensure that your makeup will go on smoothly and evenly, and also helps to keep your skin looking healthy and radiant.
There are a few different ways that you can prep your skin for makeup, but one of the most important things to remember is to always clean your face before starting. This will help to remove any dirt, oil, or makeup products that may be on your skin, and will give you a clean slate to work with.
Next, you’ll want to apply a primer. This will help to create a smooth canvas for your makeup and will also help to keep your makeup in place throughout the day.
Once your primer is applied, you can start to apply your makeup. Start with a foundation that matches your skin tone, and then build up to a concealer and powder if needed. Remember to blend well so that there are no visible lines or streaks.
How To Choose The Right Foundation
The first step is to identify your skin type. If you don’t know your what type of skin you have, visit a dermatologist or makeup counter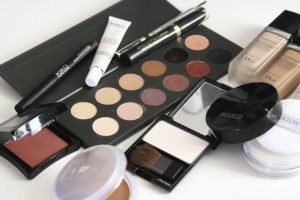 for help. Once you know your type, you can narrow down the types of foundation that will work best for you.
Skin Type
If you have oily skin, look for foundations that are oil-free and non-comedogenic. These will help control shine and won’t clog your pores.
If you have dry skin, look for foundations that are hydrating and moisturizing. These will help to nourish your skin and prevent it from looking dry or flaky.
If you have sensitive skin, look for foundations that are hypoallergenic and non-irritating. These will be gentler on your skin and won’t cause any irritation or redness.
Finish Type
The next step is to decide what finish you want your foundation to have. Do you want a matte finish or a dewy finish? A matte finish will help to control shine and give your skin a more matte appearance. A dewy finish will give your skin a healthy, glowy appearance.
If you want a matte finish, look for types that are oil-free and have a mattifying effect. If you want a dewy finish, look for formulas that are hydrating and have a luminous finish.
Coverage Type
The next step is to decide what coverage you want. Do you want light coverage or full coverage? A light foundation will be sheer and won’t cover up all of your imperfections. A full formula will be thicker and will provide more coverage.
Once you know what coverage you want, you can narrow down your choice even further. If you want light coverage, look for foundations that are sheer or have buildable coverage. If you want full coverage, look for foundations that are opaque.
Formulation Type
The next step is to decide on the formulation. Do you want a liquid foundation, a cream, or a powder foundation?
Liquid foundation will give you sheer coverage and will be easy to put on. Look for water-based formulas. Cream will give you medium coverage and will be easy to apply. Powder will give you full coverage and will be more difficult to apply. Look for talc-free.
Shade
The next step is to decide what shade you need. To find the right shade of foundation, test it on your jawline. The foundation should blend into your skin and match your skin tone. If it is too light, it will make you look washed out. If it is too dark, it will make you look muddy.
Once you’ve found the right shade, you’re ready to apply it! Start by applying a small amount to your forehead, cheeks, and chin. Then, use a foundation brush or a beauty blender to blend it into your skin. Make sure to blend it all the way down to your neck so that there’s no line of demarcation.
And that’s it! You’ve now learned how to choose the right foundation for your skin type, finish, coverage, and shade. Now go out and enjoy your flawless complexion!
Use Concealer For Coverage
Concealer can do a lot more than just cover redness. It can also be used to cover bruises, acne, rosacea and tattoos. If you have any of these conditions, you know how difficult it can be to find makeup that will cover them up. Concealer can give you the coverage you need to feel confident in your appearance.
Bruises can be difficult to cover up with makeup because they are often darker than the surrounding skin. Concealers can help to even out the color. Acne can also be difficult to cover up, but concealer can help to camouflage the blemishes. Rosacea can be another difficult condition to deal with, but concealer can help to reduce the redness.
If you have a tattoo that you would like to cover up, concealer can be a great option. It can help to camouflage the tattoo. There are many different shades of concealer available, so you can find one that will match your skin color.
Concealer is a great way to get the coverage you need for any of these conditions. It can help to even out any redness and give you the confidence you need.
How To Apply Eye Makeup for beginners
Applying eye makeup can be daunting, especially if you’ve never done it before. But fear not! This guide will teach you the basics of applying eye makeup, from choosing the right products to creating a flawless look.
First, start by selecting the right eyeshadow palette. If you’re unsure which shades to choose, opt for a neutral palette that includes a variety of tones. Once you’ve got your palette, coat a primer to your lids to help the eyeshadow stay in place. Then, use a light shade all over your lid as a base color. Next, choose a medium shade and sweep it on the crease of your eye with an eyeshadow brush. Finally, use a dark shade along your lash line for definition. Complete your look by applying mascara and eyeliner, and you’re good to go!
Eyeliners come in a variety of choices. You can use liquid, pencil or simply eyeshadow. You can choose a softer color for a more natural look or go bold with black.
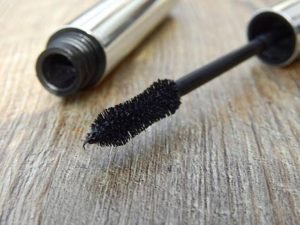 Mascara also comes in a variety of colors to choose from. Waterproof is usually a good choice since it stays on your lashes for longer.
With these simple tips, you’ll be a pro at applying eye makeup in no time. So don’t be afraid to experiment with different shades and techniques until you find what works best for you.
How to Fill In Your Eyebrows
Filling in your eyebrows can help to define your face and make your makeup look more polished. There are a few different ways that you can fill in your eyebrows, including using a pencil, powder, or pomade. Read on to learn more about how to fill in your eyebrows.
Using an Eyebrow Pencil
Pencils are a great option for filling in your eyebrows because they offer precise control. Look for a pencil that is slightly lighter than your natural brow color. Use light, feathery strokes to fill in any sparse areas of your brows. Be sure to blend well.
Powder
Powder can also be used to fill in your eyebrows. Use a small, angled makeup brush to apply it to your brows. Start with a small amount and build up the color as needed. like with pencils, be sure to choose a shade that is slightly lighter than your brow color.
Pomade
Pomades are another option for filling in your eyebrows. Pomades offer more coverage than pencils or powder, so they are great for filling in sparse brows. They are almost like a brow gel. Apply the pomade to your brows with a small, angled brush. Start with a small amount of product and build up as needed. As with the other products, be sure to choose a shade that is slightly lighter than your natural brow color.
Now that you know how to fill in your eyebrows, give it a try! Experiment with different products and techniques until you find the look that you love.
How to Contour Your Face
If you’re looking to give your face a little extra definition, contouring is the way to go. But if you’ve never tried it before, the process can seem a bit daunting. Here’s a quick and easy guide to help you get started.
1. Choose the right products. When it comes to contouring, it’s all about finding the right products for your skin type. If you have dry skin, opt for a cream or liquid contour product. If you have oily skin, powder is your best bet.
2. Find your perfect shade. When choosing a contour shade, go one or two shades darker than your natural skin tone. If you have fair skin, a light brown or beige shade will work best. For medium skin, choose a dark brown or bronze shade. And if you have dark skin, opt for a deep brown or black shade.
3. Map out your contour. Use a pencil or brush to map out where you want to apply your contour product. Start at the hollows of your cheeks and blend outwards towards your hairline. Then, contour along your jawline and blend upwards towards your ear.
4. Apply your contour. Using a brush or sponge, apply your contour product in a sweeping motion. For best results, use a dense brush or beauty blender for a flawless finish.
5. Blend, blend, blend. The key to successful contouring is blending. Use a clean brush or sponge to blend out your contour until there are no harsh lines.
How To Apply Blush
There are a few things to keep in mind when applying blush. First, choose a color that compliments your skin tone. Second, use a light hand when applying the product to your cheeks. And finally, blend well for a natural look. Using a blush brush, sweep the product onto the apples of your cheeks. Brush upwards and outwards towards your hairline. Re-apply if needed.
How To Highlight Your Features
Use makeup to enhance your best features and downplay any areas you’re not as confident about. Highlighting is all about accentuating your natural beauty so that you feel your most gorgeous. Whether you want to add a subtle glow or go for a more dramatic look, there are many ways to apply highlighter makeup. Here are some tips on how to use makeup to highlight your features:
Choose the right highlighter. When it comes to choosing a highlighter, you’ll want to find one that matches your skin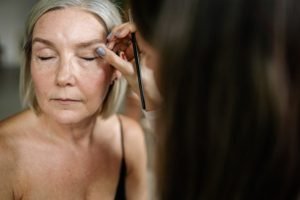 tone. If you have fair skin, go for a pink or champagne-hued. For medium skin tones, try a peachy or golden color. If you have dark skin, choose a deep bronze or copper-toned color.
Apply the highlighter to the right places. Once you’ve found the perfect shade, it’s time to apply it to your face. The most common places to put highlighter are on the cheekbones, brow bones, down the bridge of your nose, and on the cupid’s bow above your lips. But you can also use it on other places, like your décolletage or shoulders, for a more all-over glow.
Use a brush, your fingers, or a sponge to apply the highlighter. If you want a more concentrated highlight, use a small fan brush. For a softer highlight, use a fluffy brush or a damp beauty sponge. And if you want more control over where the highlighter goes, use your fingers.
Once you’ve applied your highlighter, be sure to blend it out. This will help the highlight appear more natural and prevent any harsh lines.
Start with a small amount of highlighter. It’s always better to start with less and build up as needed. This way, you can avoid putting on too much and looking like a disco ball.
Now that you know how to use makeup to highlight your features, put these tips into practice and experiment with different highlighter shades and techniques. With a little practice, you’ll be a highlighting pro in no time!
How to Apply Lip Color
There are many ways to apply lip color, but the most important thing is to find a method that works best for you. Some people prefer to use lipstick, while others prefer lip gloss or even lip balm or lip liner. Whichever method you choose, make sure that you take the time to apply the color evenly.
Here are a few tips on how to apply lip color:
-Start by exfoliating your lips. This will help to remove any dead skin cells and create a smooth surface for the color to adhere to.
-Next, apply a lip primer. This will help to keep the color in place and prevent it from bleeding.
-Now it’s time to apply the color. If you’re using lipstick, start in the center of your lips and work your way out. For lip gloss, start at the outer corners of your lips and work your way in. And for lip liner, start at the inner corner of your lips and trace along the natural line of your mouth.
-Finally, use a lip brush to blend the color and create a seamless look.
With these tips, you’ll be able to apply lip color like a pro!
How To Set Your Makeup
There are a few steps to setting your makeup that are important to follow in order to ensure a smooth, long-lasting finish. After you follow all of the above steps set your makeup with a setting spray or powder. This will help to keep your makeup in place all day long!
Follow these steps and you will be sure to have a flawless makeup application that will last all day long. You can check out Eugenia’s instagram for makeup tutorials.
If you need assistance on applying your makeup, please schedule an appointment with me. I’d love to help. It’s great to get your makeup done professionally for a special occasion!